Numerics
The Numerics view is a configurable display in which (Kernel) values can be displayed.
These can be displayed in various colors and font sizes to make it easy to distinguish the separate readings.
On this page:
View Settings
 Right mouse click in
Numerics > View Settings
Right mouse click in
Numerics > View Settings
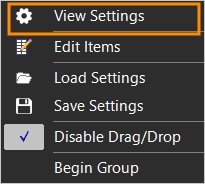
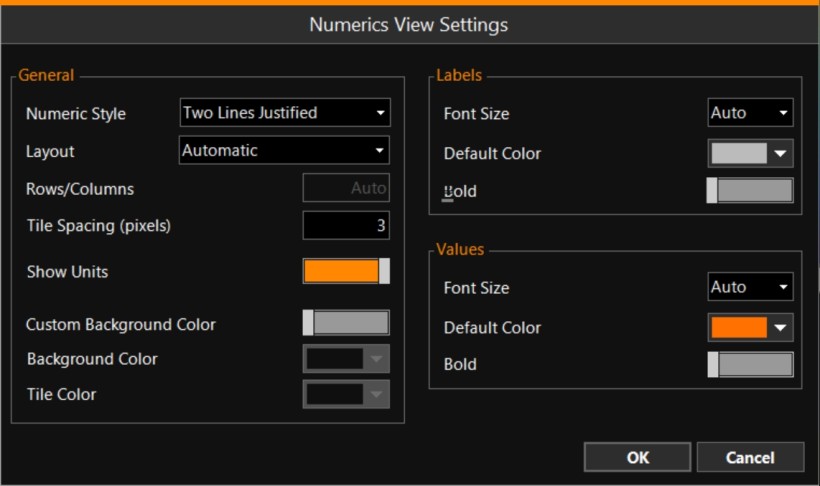
Enter settings for the looks of the values in the Numerics View:
|
Numerics View Settings |
|
|---|---|
|
Numeric Style |
Use the drop down menu to select how to place the labels and the values in the tiles and in the viewing window:
|
|
Use the drop down menu to select how to place the tiles in the viewing window:
|
|
|
Rows / Columns |
When Layout is not set to 'Automatic', enter how far apart the tiles should be placed. |
|
Tile Spacing |
Spacing in pixels between the files to create a visual separation. |
|
Show Units |
Show units behind the values if applicable. |
|
Custom Background Color |
Optional use of custom colors for the background and tile colors. |
|
Background Color |
If activated above, select the color for the space among the tiles. |
|
Tile Color |
If 'Custom Background Color' is activated above, select the color for the tiles. |
|
Labels |
|
|
Font Size |
Use the drop down menu to select a font size, or use Auto to let the software select one. |
|
Default Color |
Select a color using the drop down menu. |
|
Bold |
Use the toggle button to make the text inside the tiles bold. |
|
Values |
|
|
Font Size |
Use the drop down menu to select a font size, or use Auto to let the software select one. |
|
Default Color |
Select a color using the drop down menu. |
|
Bold |
Use the toggle button to make the text inside the tiles bold. |
|
OK |
Click OK to save the individual settings and click OK again to save the selection. |
Edit Items
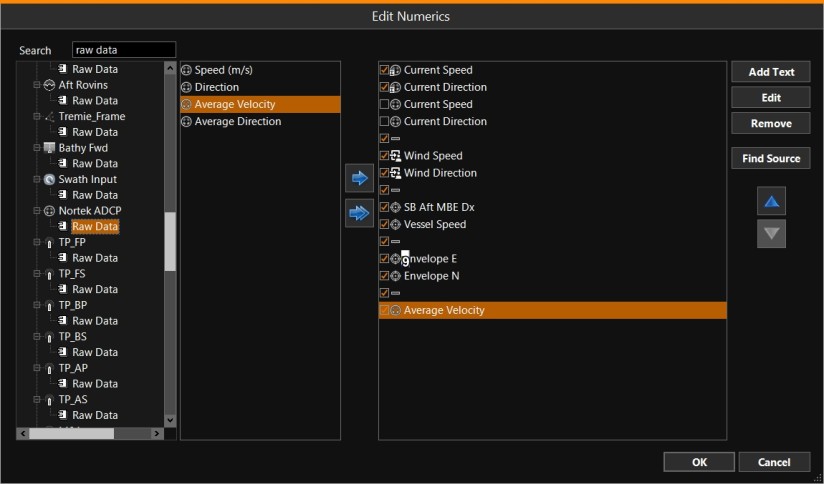
Select which info to show in the Numerics display:
Right-click in the Numerics display > Edit Items > scroll down in left hand column
|
Edit Numerics |
|
|---|---|
|
Search |
When the list of items is very long, shorten it by entering a term in the Search box at top left. |
|
|
Select which items you would like to see and click the blue arrow to move them to the right hand column. Use the double arrow to move all items to the right. |
|
Add Text |
Click this button to create a tile with custom text. It could be used, for example, as a header above a column when Layout is set to 'Fixed Column Count'. |
|
Edit |
Highlight an item in the right hand column and Edit its settings. |
|
Remove |
Highlight an item in the right hand column and remove it from the list of items to show. |
|
Find Source |
Finding the source of a numeric item can be time consuming, especially with large configurations when the tree view contains many items. This button will automatically select the source and property of the selected item. |
|
|
Move the items with the up / down arrows |


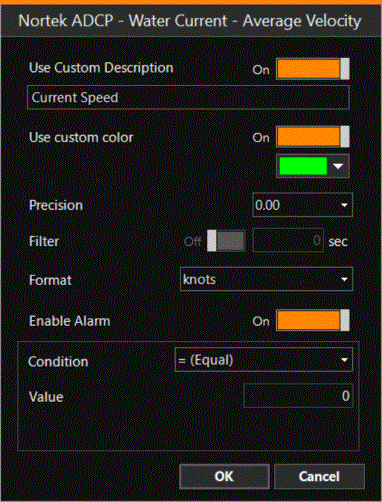
This offers the options to make this information line stand out in the Numerical View:
|
Edit Numerics of one item |
|
|---|---|
|
Use Custom Description |
Set to 'On' if you would like to show a name that is easier to read/recognize than the description coming from the system. |
|
Box with selected Numerics item |
Only available when the setting above is 'On'. Type in the name which will appear in the Numerics view. |
|
Use custom color |
Set to 'On' if you want for the text to stand out. Select a color from the drop down menu. |
|
Precision |
Select the number of digits after the decimal point using the drop down menu. |
|
Filter |
When presenting numerical items in a Numerics view, the value is the ‘raw’ computed value. For Speed and Ground course there is already a filter period, which is predefined with respect to the type of Equipment For some cases, for example the ETA of the speed on a longer voyage, extra filtering is required. This option is present for numeric items that are a number or a time. A filter can't be used if an alarm is configured and vice versa, to prevent having / missing alarms due to filtering settings. The data shown in Numerics is filtered depending on the filter parameters entered in the properties of the items. A filter symbol is shown next to the name or above the values to indicate that the numeric item has an active filter.
|
|
Format |
Use the drop down menu to select the format in which the values are to be shown. |
|
Enable Alarm |
Set to 'On' if you want for an alarm to be raised under a certain Condition. See line below. |
|
Condition |
Select a condition for the alarm to be raised. Use the drop down menu to select a setting. |
|
Value |
Enter a value that the condition needs to meet before the alarm is raised. |
|
OK |
Click OK to save the individual settings and click OK again to save the selection. |


Begin Group
Right mouse click on item in
Numerics > Begin Group
Right-click on an item and select 'Begin Group' to draw a horizontal line above the item.
This way, you can place related items together, separated from other items by horizontal lines.
After moving around items with the up / down arrows or dragging / dropping the tiles, the result could look like this:
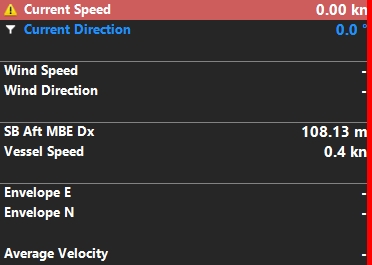
In this example the alarm was enabled: when the water current's speed equals 0, the alarm will go off.